|
|
As soon as I had committed to the barrel vault of the Main Hall, I knew I wanted some kind of glass ceilings over the East & West wings. And my pattern of thinking progressed just like it did with the Main Hall's barrel ceiling: I was looking for an existing product or thing that I could use to cut into shape that would suffice as a glass roof. I was pretty sure I wanted these canopies to be round, or at least curved, so I found a few acrylic jars, pitchers, and even some soda bottles. Most of these were either too thick, or were of such poor quality that the plastic surface had obvious distortions or even bubbles in them.
I started looking at household products and commodities right around the time I was finishing up the Main Hall. And, just like what happened with the barrel vault ceiling, I ended up realizing that these were going to have to be custom made.
|
|
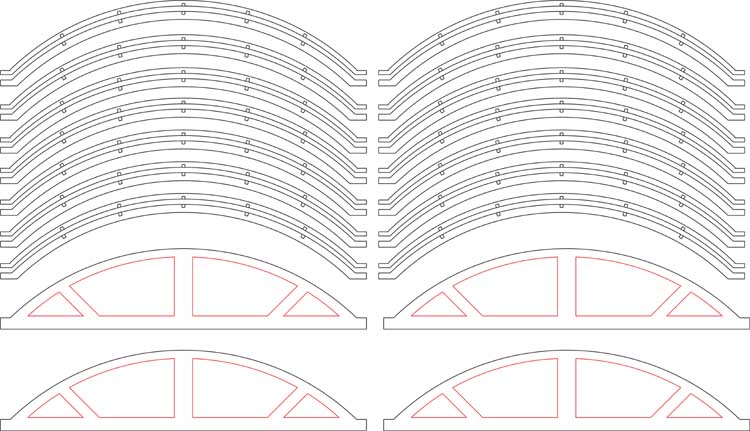
The CAD design for the two glass canopy roofs.
|
There are a couple of ways to make a curved window canopy. One way is to make the curve out of a composite of flat surfaces. In essence, your "curve" is really not curved, but is rather a series of line segments which are all straight, but are all slightly bent with respect to each other, and this approximates the curve you are after.
Another way is to simply have a curved piece of "glass" and then build the frame, or mullions, onto the curved glass. This latter type is what I ended up doing.
The canopies started life as a simple rectangle of wood, made from 3/8" square dowel. This was then painted the sandstone color. The next part involved some thinking about how I might design some lasered parts to facilitate this part of the project. |

|
|
Left: starting out with just a simple rectangle, made of 3/8" square dowels.
Right: Paint on the first set of lower supports is drying.
|
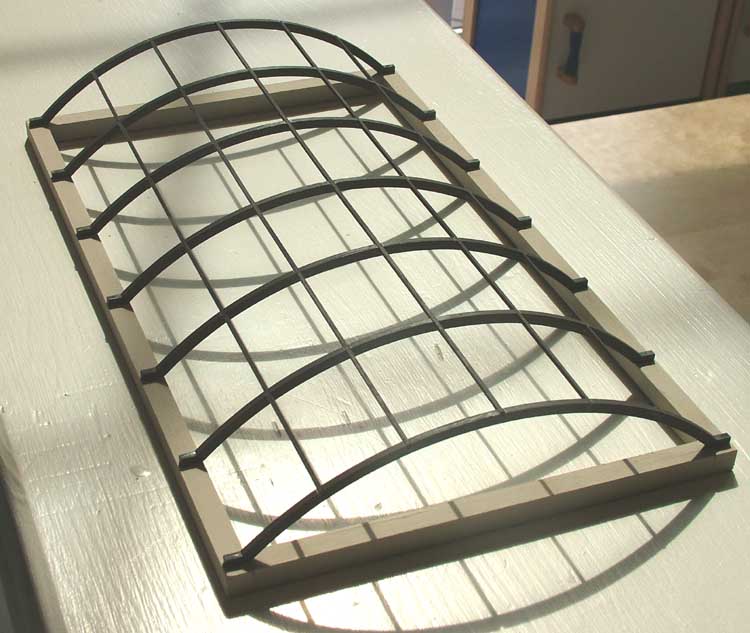
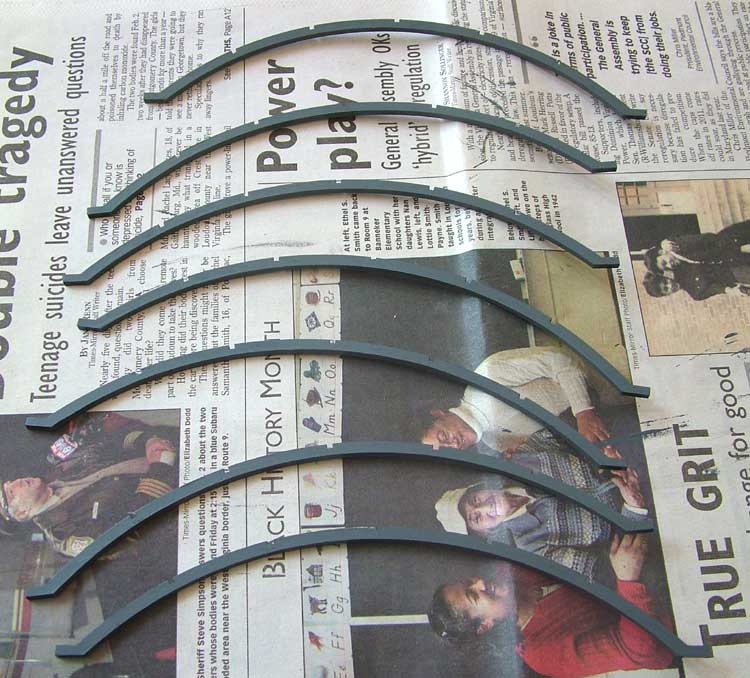
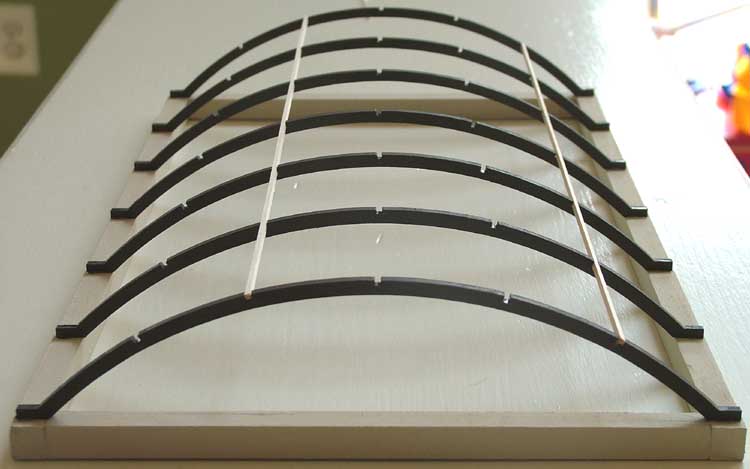
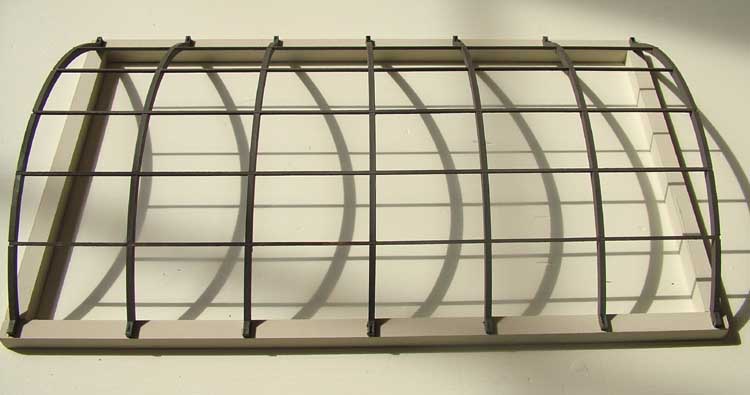
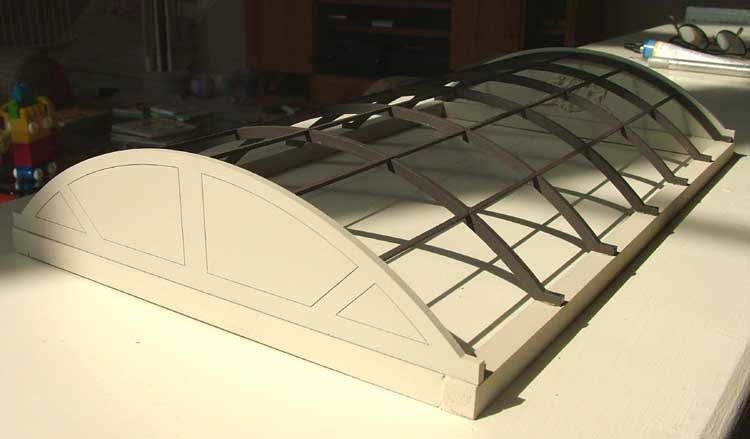
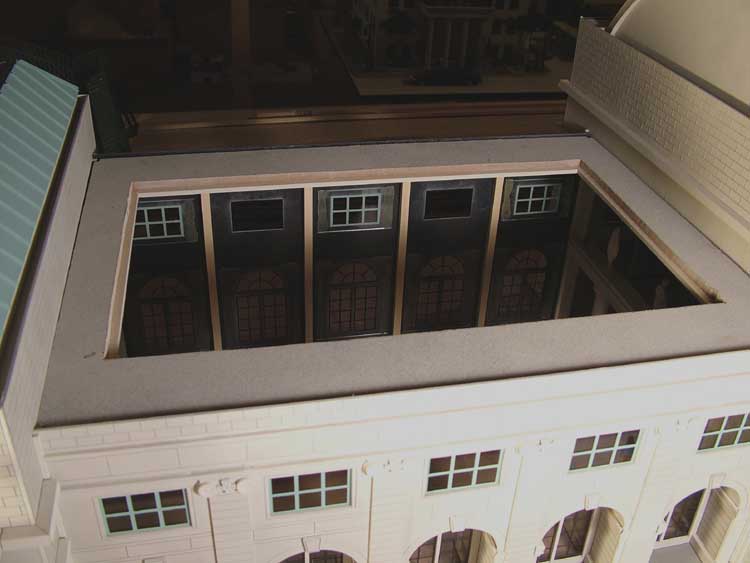
If you look carefully at them, you can see that each canopy is really a set of seven curved arch pieces, connected by straight lateral pieces. This forms a grid of mullions for window "panels". So I started designing the lasered parts for the bottom supports first. These are a shallow curve (1/4-circle, centered), with flattened "feet" at each end for mounting onto the wooden rectangle.
The arch support pieces all have notches cut out of them, which allowed me to easily install 1/16" square dowels length-wise. With all 7 of these arch lower supports mounted, and the lateral straight pieces installed, the structure became stronger and more rigid. The next step was to create the upper arch supports. These are very similar to the lower ones, but are thinner, and have the notches cut out of the bottoms instead of the tops.
|
|
|
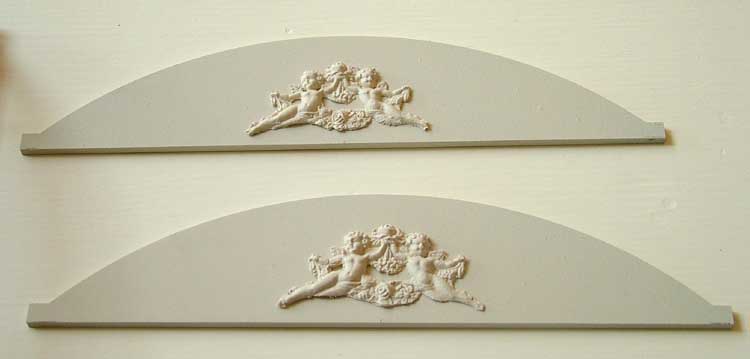
Left: Two of the end-caps of the canopy. The cherub appliques were found at an on-line doll house supplier.
Right: In this view, you can see how all the notches line up, allowing me to easily install 1/16" wooden square strips in them.
|
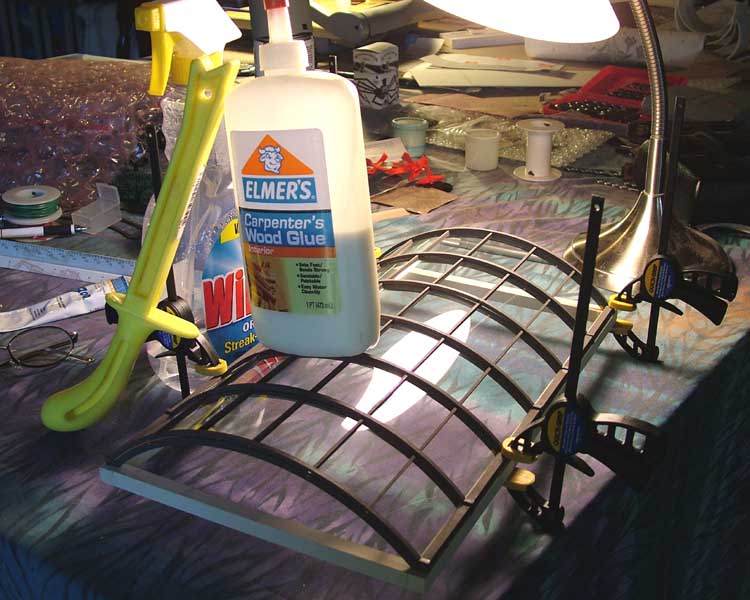
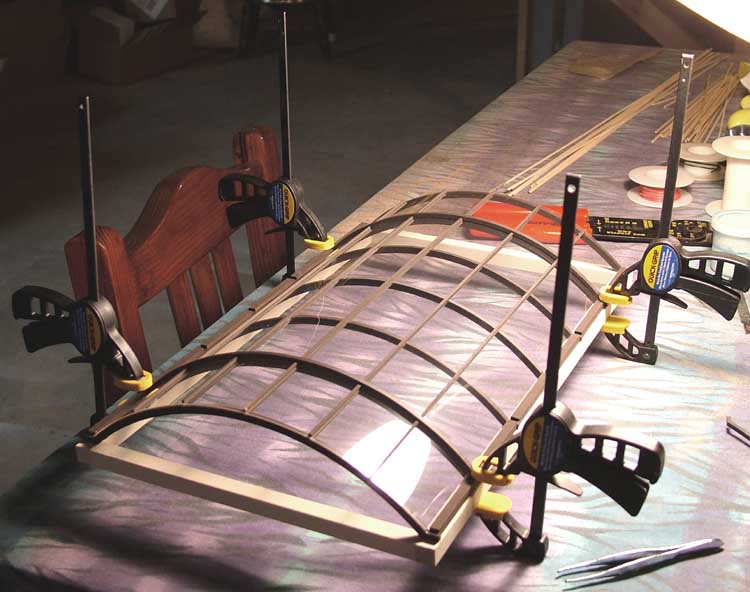
The idea was to obtain some clear plastic film, and cut it to the perfect size to bend over the lower supports. Then, I carefully mounted the upper supports on top of the curved plastic film, and these were glued to the tops of the "feet" of the lower arch supports. This is of course much easier to see in the photos.
It was tricky to get this to work well, while trying to prevent the plastic film from getting dings and scratches in it. I recommend wearing thin, latex gloves while manipulating the plastic film, to prevent from getting oily fingerprints all over it. Getting the first two upper arch supports mounted was the hardest, since I had to get the plastic to behave and bend properly at the same time. Once those two were mounted (on opposite ends of the canopy), I inserted the exterior lateral straight pieces (same 1/16" square sticks) into one end, and slid them all the way to the other end, where they could be held in place by the notches on that side. I found I did not need any adhesive to hold these upper straight sticks in place, as the upper arch supports mounted over top of them, and glued down to the mounting feet of the lower arch supports, provided more than enough retention to keep them from going anywhere. And this is a good thing, as I'm not sure how I would have been able to glue them to the notches, and not get the adhesive on the plastic film.
|
|
|
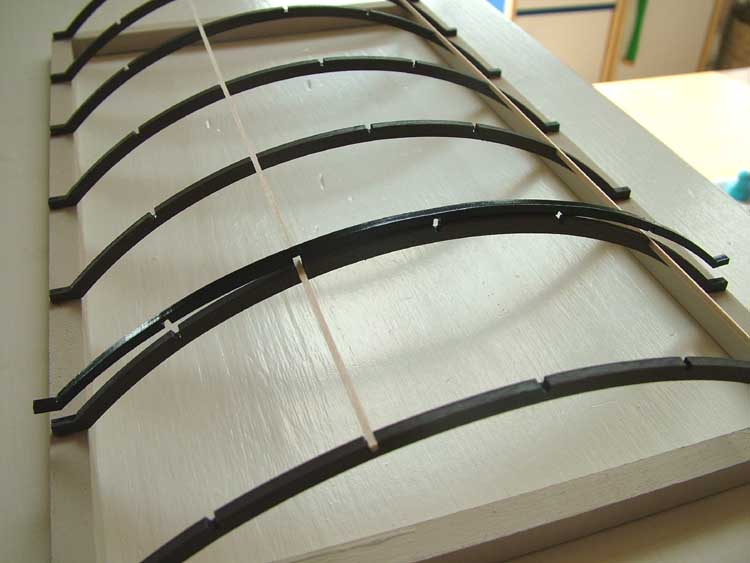
Left: An early test. I placed one of the top supports over a lower support, to see how things would look. Due to the lasering,
the top support is a little bent outward, making a wider curve. But this conformed once glued down over the "glass".
Right: All the lateral sticks have been installed in the lower supports.
|
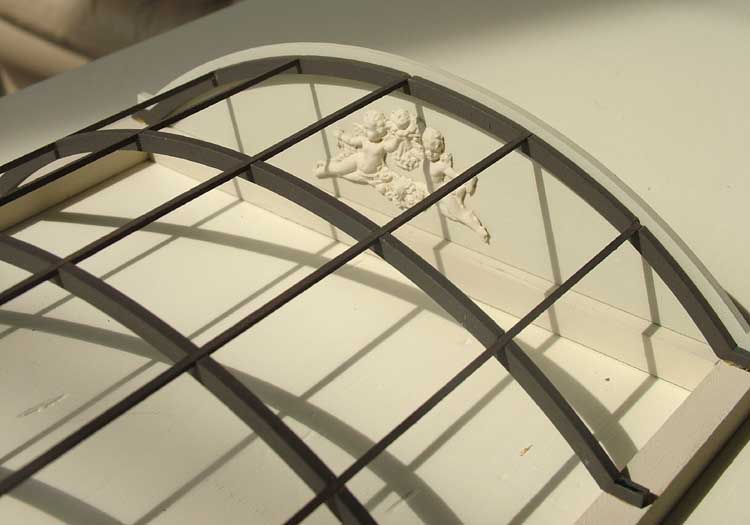
The end caps of each canopy are solid, with some etching detail on the exterior, and some relief sculptures ("appliques") on the interior. These sculpted pieces were obtained from an on-line dollhouse supplier.
With the glass canopies being so visible from the outside, and since they provide easily the best view into the interior of the station, I thought it would be a neat effect to light up the cherub appliques. This was done with more dollhouse lighting supplies - little brass "painting" lights, mounted underneath the sculpted reliefs. The placement of this kind of light is very important: you want the light to cast highlights and shadows to accentuate the texture and details of the sculpted relief in the appliques. Shining a light directly on top of, or in front of an object tends to "wash it out", and this is generally a pale, unflattering look, which flattens and obscures the details of what you want to present.
|
|
|
Left: A test-fit with the end-caps, and the applique can be seen for placement.
Right: Here you can see the exterior etchings on the end-caps.
|
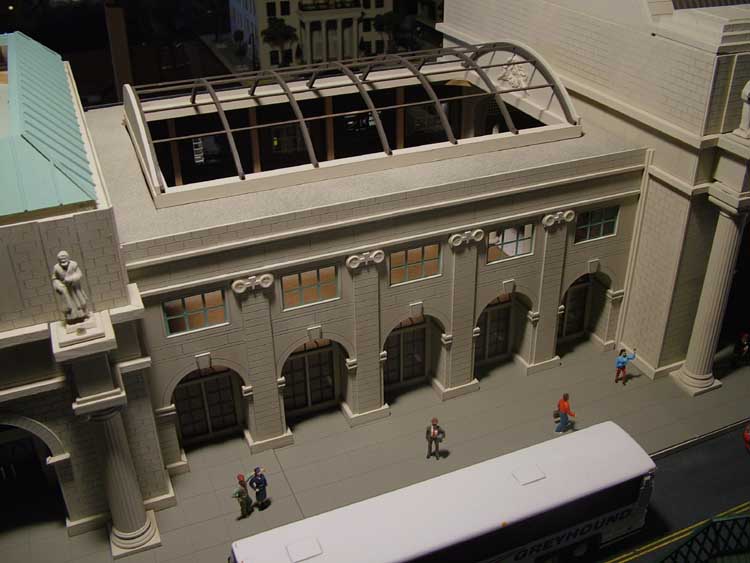
Each of the glass canopies is fitted into a rectangular hole cut into the ceiling of the East and West connecting halls. I simply placed the rectangle of the canopy on top of the roof, and traced lines around the shape onto the roof. This gave me a reasonable rectangle to cut out of the roof with a jig-saw.
With the rectangle cut out of the roof, the canopy unit can drop right through the ceiling. To hold it in place, some wooden trim moulding was installed on the connecting hall's ceiling. This trim is about 1/2" wide, and it was mounted half-way over the interior of the rectangular cutout in the ceiling. This created a ledge for the canopy unit to sit on, and also covered up my ugly jig-saw cuts.
|
|
|
Left: The first canopy unit, with only the lower supports assembled, and no "glass" yet, is set on the West Hall roof for placement.
Right: A delicate balance as I try to compensate for a broken top support. The weight of the glue bottle is holding the
two broken pieces together while the adhesive cures.
|
On the top-side, I mounted some additional wooden trim to conceal the jig-saw cuts, and provide a nice raised "seat" for the canopy unit to extend from.
One of the greatest challenges in this part of the project was managing the wiring for the lights in the canopies. At first I thought about making simple metal contacts at each corner of the canopy rectangle, which would sit on top of metal contacts installed into the corners of the "shelf" that the canopy unit sits on. Then, the unit could be easily lifted out without the need for any wires or plugs. This proved difficult for me, as my wooden rectangle is not perfectly flat, and so there seems to always be one corner that doesn't want to make contact. Also, the canopy unit is very light-weight, which makes it difficult to establish a solid electrical contact between the metal plates. |
|
|
Left: Gluing down the first two upper arch supports over top of the acetate sheet ("glass").
Right: The West connecting hall with the rectangular hole jig-sawed out. You can see the
internal "shelf" ledge moulding mounted onto the ceiling, which holds the canopy in place.
|
So I ended up needing to use very small wires and plugs. These were obtained from Miniatronics. They are high quality, and quite small (1/8" square), so they were a reasonable fit for this use. Since the bulbs in the brass picture lights in the canopy are replaceable without disassembling the light fixtures, I thought about simply soldering wires into place permanently. But it is almost crucial that the canopy units be removeable, for cleaning the "glass", and also for lifting the whole ceiling off of that part of the station building.
|
|

|
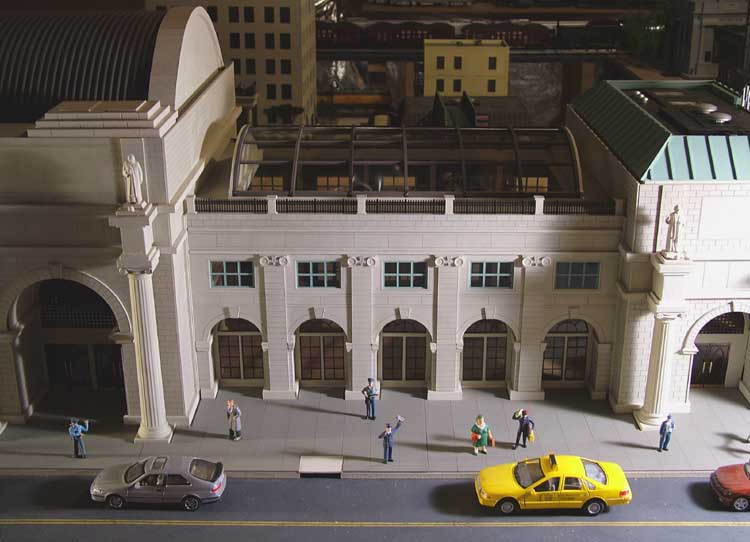
Left: The East connecting hall finally starts to look totally complete. The glass canopy is finished, and the ballustrade has been constructed.
Right: In time I hope to include photos of the canopies when they are truly 100% complete. I still want to add some decorative crown
moulding to the interior perimeter of each canopy base, and also the lights are not yet integrated.
|
The results are not half bad. The real Washington Union Station is not symmetrical on either side of the Main Hall. The West Hall has a very ornate and elaborate half-barrel ceiling made of glass panels. The East Hall has a flat roof, and that side of the Main Hall's barrel ceiling ends in a flat, half-circle of windows with beautiful grille work, behind the clock.
The East Hall is a gorgeous work of art, and in no way conflicts with the style, grace, and sophistication of the rest of the station. But it is nowhere near as impressive as the West Hall, and it is a striking lack of symmetry that has always puzzled me. Although I cannot find any discussion of this in the most popular books on WUS, nor on the Internet, my suspicion is that the original plans probably called for the East Hall to be symmetric to the West Hall, complete with it's own half-barrel of glass panels. There is evidence that the project simply ran out of funds towards the end of construction, and it's possible that Daniel Burnham's original vision became too expensive for Congress and the railroads to bankroll. That is all my own speculation, however. Regardless, I preferred a symmetrical look for my model, and so both the East and West halls have these glass canopies. As with the rest of the model, these are dramatically scaled-down versions of the real thing - not only in terms of size, but also complexity and architectural sophistication. Still, they do add quite a bit of visual interest to the East & West hall rooflines, and they also provide the only real vantage points to view the station interior without having to place your face flat on the table and your nose right up against the windows. :) |
|
|
|
I'm also currently in the process of implementing the interior elevations to the East connecting hall. This will
render interior photos much more appealing, and will even enhance the exterior close-ups since right now these
canopies are exposing the unfinished interior. More to come: check back around the July timeframe.