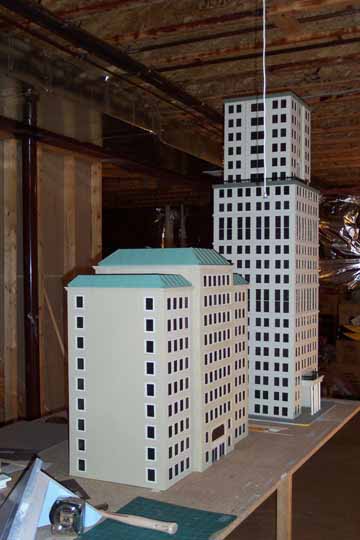
Standing right next to "West Park Tower".
|
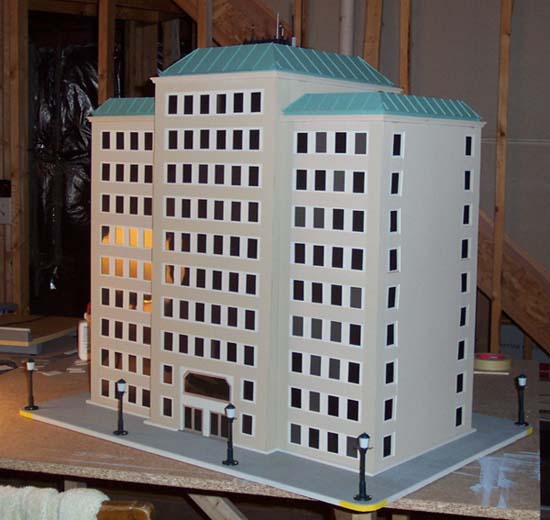
After the brutal beating my thumb and forefinger took while cutting out the 650 windows of the first building with an X-acto knife, I knew I had to find a better way
to achieve the window cut-outs. While doing some touch-up work one day, I glanced down at some 35mm slides my father was organizing, and I
realized that the slide frame was the perfect size of an O-scale office window. Or close enough anyway.
What followed is what you see here - another downtown building, but this one's windows are made entirely of 35mm slide sleeves. These slide
sleeves are easily found on the Internet for very little cost. I think I paid about $30 for a box of 1000 of them.
|
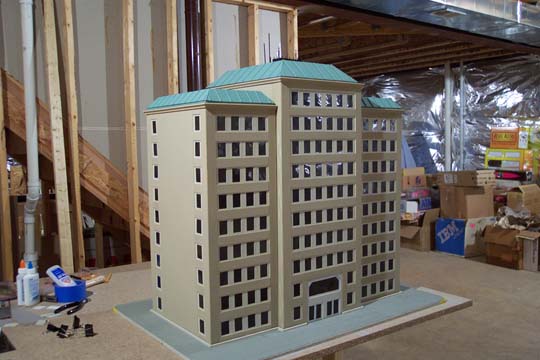
You can barely make out the roof detail of the center building here. There are two little blue class/marker lights atop the
center-most black unit.
|
Then, using plastic smoke-colored folders I found at Office Depot ($0.69 each), I cut little windows and inserted them into the blank slide sleeves that I
had pre-painted. Then it was just a matter of gluing the assembled slide sleeve windows togther to make a single floor of the building, and then replicating
this for the 10 stories of the center building. The side wings of the building are only 9 stories. With the vaulted roofs, they are 10 stories and the center
unit 11 stories tall.
The interior lights up in much the same way as my first building - with a center-mounted vertical dowel mounted into the wooden base. Attached to the dowel
are four incandescent light bulbs, which I was surprised to find was enough to adequately light not only the center building but the two wings as well.
|
The detailing of the roofs. Just some imaginative roof-top machinations, and two blue marker lights.
|
The vaulted roofs were a little tricky. The easiest way to see how they were constructed is to look at the underside of them (see photo). It's basically just a lot
of custom cut square dowels and cardboard. The "ridges" on the exterior are again just custom-cut little wooden twigs. These needed to be glued by brushing small
amounts of slightly watered-down glue with a tiny paint brush.
The "roof detail," as I call it, is actually comprised of slices of a standard 2 x 4 stud. The center building has two of these, cut different heights and mounted
perpendicular to each other. I then mounted more little sticks around the perimeter of the "front" piece, and painted the resulting units flat black. Then I drilled holes
into them and inserted various black and silver skinny round dowels (antennae) into them, and then mounted the units onto the roof. For the side wing buildings, I again
cut slices of 2 x 4, painted them black, then mounted the silver-painted fan covers on them. The fan covers are the little tabs you get when you open a carton of orange
juice.
|
Close-up of the sidewalk and street lights. These are the cheap plastic Lionel MPC-era streetlights. This was taken before the porticos were made.
|
I ran out of the RailKing lamp posts on the first building (who can afford more than four of those things anyway?). For the second building, I have eight old Lionel plastic street lamps that, amazingly, still work. Upon installing these, I realized that they were too bright at 14 volts for my taste. But I still wanted to keep the internal lights at 14 volts because that made them bright enough to light up the interior. So I used resistors to step down the voltage to each exterior lamp post. The lamp posts now run on about 8 volts, which was about right for the kind of glow I was looking for.
|
The Oxford Twin Pocket Portfolio, model number 57460 (bar code: 78787 57460). Bet they never thought how useful these would serve as O-guage office building windows.
|
Update 1-4-2003:
I get a lot of questions about the pented roofs. Indeed, these were the most challenging part of this building. Looking at the photo of the underside of the central pented roof, you can see how it was done. The framing is made with the same 3/8" x 3/8" wooden square dowels (available at Home Depot for about 75 cents for each 3-foot dowel) that were used to frame the structure of the building itself. Basically, I started off by making a rectangle of the right dimensions to fit nicely on the top of the building. Then I made a second rectangle that was about 2 inches smaller than the first one in both dimensions. Then I cut and glued in 4 diagonal braces in the corners of the larger (bottom) rectangle. I then cut 4 posts, each about 2" tall, and used these posts to attach the smaller rectangle to the larger one, using the corner diagonal braces as a base to mount the posts. This is a lot easier to see in the photo than to describe with words. You must take care to ensure that the smaller, top rectangle is reasonably centered over the larger, bottom rectangle.
Once this contraption dried thoroughly, I then cut 14 pieces of square dowel, each one with opposite 45-degree angle cuts at each end. The lengths of these must all be equal, and they must all be almost exactly the distance from the top edge of the upper square to the top edge of the lower square. This is probably the most difficult part to accomplish. Once these were cut, I glued them along the sides of the pented roof structure and this formed a solid frame to which you can mount flat cardboard pieces. These cardboard pieces must be measured and cut pretty well, or the pented roof will have unsightly gaps at the corners where the sides join. The first few pieces I cut were way off in demensions. Always dry-fit the pieces before attempting to glue them into place.
|
Here's the base with the sidewalk and streetlights installed. I built a "seat" out of wood strips for the building to sit in. This keeps light leaks from shining through. The central
dowel is wrapped in aluminum foil as a heat dissipator since the light bulbs are taped to it.
|
Once all four sides of the pented roof were assembled and dried, I then used very thin strips of bass wood and cut these into lengths needed for the ribs on the pented roof sides. I glued these on by using a very small paint brush and applying a water and wood glue mixture to each little strip. I also glued a strip of this bass wood into each corner, which helped to cover the unsightly gaps in the corners resulting from my lousy measuring. This worked out surprisingly well.
At this point I spray painted them with a green paint I was lucky enough to find at Michael's craft store. However, this paint had a shiny, satin finish to it, and I wanted it to have a flat finish. So I had to get a dull-coat and spray that on top of the dried paint.
|
Here's a shot of the underside of the central pented roof. The wiring includes a couple of resistors in series to reduce the voltage going to the marker lights on the top side.
|
Finally, I mounted another flat piece of matteboard to the underside of the top rectangle. I had to cut notches out of the corners for it to fit because of the posts at each corner, but this wasn't difficult. I painted the visible (top) side of this flat piece a flat black before fixing it in place with glue.
|
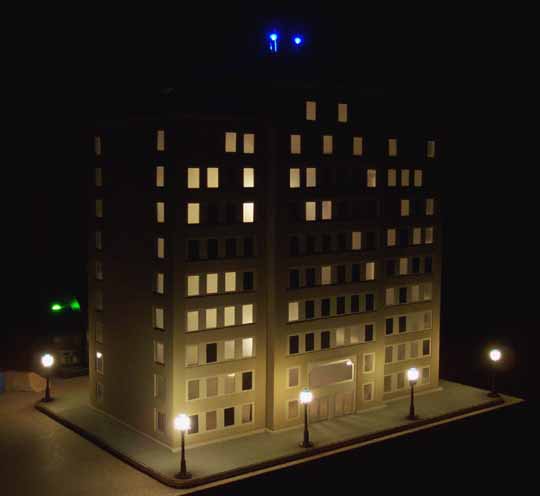
Illuminated, with the room lights on...
|
|
... and with the room lights off.
|
|